Install with Docker
This guide walks through deploy/compose.yaml, the canonical way to run the server. It works on any Linux host, on a NAS that runs Docker, and on Docker Desktop. For Unraid, see Install on Unraid instead.
What you need
- Docker Engine with the Compose plugin (
docker compose). The override example below uses the!overridetag, which needs Compose 2.24 or later. deploy/compose.yamlfrom this repository, plus an override file you write yourself (step 2). The image itself is pulled from the GitHub Container Registry; nothing is built on your machine.- Your comics or manga in folders that the Docker host can read.
What the Compose file sets up
| Setting | Value | Why |
|---|---|---|
| Port | 127.0.0.1:8080:8080 |
Published on loopback only. Only the Docker host itself can reach the app until you change this or put a reverse proxy in front. |
/data |
named volume mangapixer-data |
Database, sign-in keys, logs, backups and thumbnails. This is the volume to back up. |
/cache |
named volume mangapixer-cache |
Cached page images. Size-limited (1 GiB by default) and safe to delete. |
/scratch |
named volume mangapixer-scratch |
Temporary work folders used while opening archives. Safe to delete. |
read_only: true + tmpfs: /tmp |
The container's own filesystem is read-only; only the three volumes and /tmp are writable. |
|
no-new-privileges |
The process cannot gain privileges after start-up. | |
| Logging | local driver, 20 MB × 5 files |
Container output cannot fill your disk. |
| Restart | unless-stopped |
The server comes back after a reboot or crash. |
The container starts as root only long enough to fix ownership of the state folders, then drops to UID/GID 1000:1000. You can change that with PUID and PGID (see Configuration).
Compose names the volumes after the project, which defaults to the folder containing the Compose file. With the commands below the volumes are called deploy_mangapixer-data, deploy_mangapixer-cache and deploy_mangapixer-scratch.
Step 1: get the Compose file
Either clone the repository, which is also what you need to build from source later:
git clone https://github.com/dixit92/mangapixer.git mangapixer
cd mangapixer
or download just the Compose file into a folder of your choice:
mkdir -p mangapixer/deploy && cd mangapixer
curl -fsSL -o deploy/compose.yaml https://raw.githubusercontent.com/dixit92/mangapixer/main/deploy/compose.yaml
The commands below assume you are in that mangapixer folder.
Step 2: mount your media read-only
The server never writes to your media (see Library layout), and mounting it read-only makes the operating system enforce that too. Keep your real paths out of the tracked Compose file: put them in an override file next to it, deploy/compose.override.yaml:
services:
  mangapixer:
    volumes:
      - /srv/comics:/media/comics:ro
      - /srv/manga:/media/manga:ro
Mount every share somewhere under /media. That is the folder the library Browse… picker starts in (you can change it with MangaPixer__Storage__MediaRoot).
Compose only reads the override file when you pass it with -f, as in the commands below. The repository's .gitignore already excludes deploy/compose.override.yaml, so Git never picks it up.
Step 3: choose the image tag
The Compose file pulls ghcr.io/dixit92/mangapixer:${MANGAPIXER_VERSION}. When the variable is unset it falls back to latest, which moves with every release; pin the version you want so upgrades happen when you decide. Released versions are listed on the Releases page. In a clone, this script prints the version of the checked-out source:
pwsh ./scripts/Get-MangaPixerVersion.ps1
Then set it in your shell. Set it again in every new shell before you run docker compose, or Compose looks for an image under the fallback tag.
export MANGAPIXER_VERSION=1.27.0 # bash / zsh
$env:MANGAPIXER_VERSION = "1.27.0" # PowerShell
Step 4: start
docker compose -f deploy/compose.yaml -f deploy/compose.override.yaml up -d
The first start pulls the image (about 600 MB compressed). Later starts reuse it.
Check that the server is up:
curl http://127.0.0.1:8080/health
It answers Healthy. The image also has a Docker health check that calls the same endpoint every 30 seconds, so docker compose -f deploy/compose.yaml ps shows (healthy) once start-up finishes.
Step 5: create the admin account
There is no default username or password. A new server has no users at all.
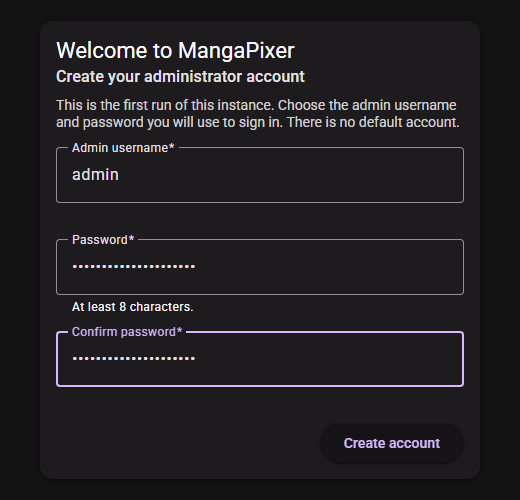
Open http://127.0.0.1:8080 in a browser. The Welcome to MangaPixer setup screen appears. Choose an Admin username and a Password, confirm it, and select Create account. You are signed in as the first admin.
- Passwords need at least 8 characters, including at least one lowercase letter.
- Usernames can contain letters, digits and
- . _ @ +. No spaces.
The setup screen only works while the server has no users. After the first account exists, the setup endpoint refuses every request, so nobody can use it to create a second admin.
Step 6: add a library
- Open the account menu and choose MangaPixer Administration.
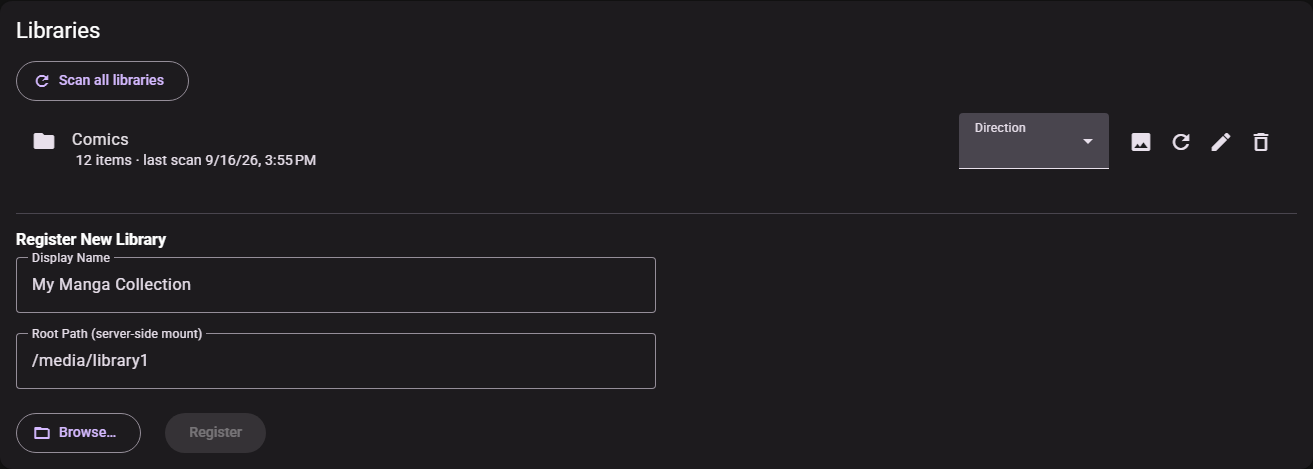
- In the Libraries card, under Register New Library, enter a Display Name and a Root Path (server-side mount), for example
/media/comics. Browse… lets you pick a folder under/mediainstead of typing it. - Select Register.
- Select the Scan now button (the circular-arrow icon) on the new library's row. Registering a library does not scan it straight away; without Scan now the first automatic scan starts within a few minutes, and after that the library is rescanned daily (change this with Auto-scan under the library's row). See Library layout.
New users you create see no libraries until you give them access. See Users and access.
Reaching the server from other devices
The default port mapping only listens on 127.0.0.1. You have two options:
- Recommended: keep the loopback binding and run a reverse proxy on the same host that adds HTTPS. See Reverse proxy and HTTPS.
- LAN only, plain HTTP: replace the port list in your override file. The
!overridetag replaces the list instead of adding to it:
services:
  mangapixer:
    ports: !override
      - "8080:8080"
The server always listens on port 8080 inside the container. To use a different host port, change only the left-hand number (for example "127.0.0.1:8181:8080").
Upgrading
- Set
MANGAPIXER_VERSIONto the new version from the Releases page (andgit pullif you keep a clone, so the Compose files match). - Pull and restart:
docker compose -f deploy/compose.yaml -f deploy/compose.override.yaml pull
docker compose -f deploy/compose.yaml -f deploy/compose.override.yaml up -d
Your volumes are kept. On start-up the server upgrades the database schema if the new version needs it. Before it changes an existing database it writes a snapshot called pre-migration-<UTC timestamp>.db to /data/backups. If that snapshot fails, the server refuses to start rather than risk your data. These snapshots are separate from the daily backups: the server keeps the newest 3 of them and deletes older ones only after a new one has been written successfully.
Each version is its own image tag, so the previous image stays on disk. Once the new version is running, you can remove old ones with docker image rm ghcr.io/dixit92/mangapixer:<old-version>.
Building from source
Contributors and anyone who wants to run an unreleased commit add the build overlay, which builds the image from the clone under the same name the canonical file pulls:
docker compose -f deploy/compose.yaml -f deploy/compose.build.yaml -f deploy/compose.override.yaml up -d --build
The build is fully containerized (no .NET or Node.js needed on the host); the first one downloads the SDK base images and takes several minutes. Set MANGAPIXER_VERSION to the version in Version.props (pwsh ./scripts/Get-MangaPixerVersion.ps1 prints it) so the local image does not shadow a released tag.
Where backups land
The server writes its own database snapshots to /data/backups in the mangapixer-data volume: a rotating one every 24 hours (newest 7 kept) plus one-off snapshots before schema upgrades and restores. What they contain, how to copy them out, how to restore one and how to change the schedule are all in Backup and restore.
To keep the rotating snapshots on another disk, add a writable bind for them, for example - /srv/archive/mangapixer-backups:/backups under volumes: (owned by 1000:1000), then choose Custom folder /backups in Administration > Backup settings. deploy/compose.yaml has a commented example. The pre-migration and pre-restore snapshots stay in /data/backups.
Stopping and removing
docker compose -f deploy/compose.yaml -f deploy/compose.override.yaml down
down keeps the volumes. down -v deletes them, including your database and backups. Copy /data/backups out first if you ever do that.